Tuesday, June 25, 2013

Sneaky peeks of WIPs and some Christmas Tilda news

A tiny peek at my wall hanging project
Quite possibly, my favourite book block
 I am a big fan of Ayumi Takahashi of Pink Penguin fame. She creates sweet and useful projects, using fabrics that I appeal to my over-riding sense of fun and whimsy, combined with my deep and abiding adoration of linen and linen blends.
I pre-ordered her book, Patchwork Please, months before it came out in April.
As soon as I saw these paper pieced books, I knew I found my Miss B's graduation present. I am not making the full quilt, but a blanket band. I have been collecting book themed fat quarters for a while now, and I settled on a few that more or less represent her book interests -- which are wide and varied. She has been a voracious reader since early childhood, and so these book blocks were tailor-made for her.
I am a beginner paper-piecer, and it was a slow go for me, despite the book's clear instructions with many photos. Patience would be a valuable asset. However, I don't have it, and so I make mistakes. Also, a lot of mess!
None of that was Ayumi's fault.
No, I did not keep the mistakes to take photos of them.
I swore some, then threw the mess away.
That's just how I roll...
After TWO unfortunate trimming accidents, and countless unpicking of the A section, I finally turned out sufficient blocks to do the blanket band I have planned. Try to ignore all those hanging threads, I haven't tidied them yet.
In a few weeks' time, I will also be posting a tutorial on doing quilted blanket bands. They are a nice alternative to making a full sized quilt, and are usually quick to finish -- as long as you are not doing a thousand other things at once.
Remember doodling on your notebooks?

Kind of love this one too!

This is the very first book Miss B loved

Remember reading Dick and Jane?
I have also pre-ordered Tone Finanger's upcoming book, Tilda's Sweet Shop. It will be mine in about 150 days. Yeah, I have no patience when paper piecing, but I can wait 150 days for a book. I don't get it either.
There are not many places to get any idea at all of what's in the book, but I did find one image. The book is a small one, just 48 pages, but it uses my very favourite colour palette, off white, green-blue and pinks. The focus is on old fashioned cakes and sweets and old world Santas and angels. Just yummy on so many levels.
Yummy new Tilda book November 2013

Under wraps...

I am currently working on a project for next Spring's issue of A Needle Pulling Thread. Sadly, I can't share anything about it.
Okay, I can say it is a wall hanging for a baby or small child's room. It is pretty involved, and has a lot of hand work. Therefore, it is just my kind of project.
I will be back with some photos of other things I've been doing very soon. Watch this space ...
In other news,  my very talented Miss B graduated from teacher's college recently.
She is getting a special present, just as soon as I get the sashing done on the paper pieced blocks.
Oh yes, cue the circus music, I am entering the distracted crafter season, where summer tries to lure me away from my creative space and out into the big, wide world. Sigh.


Wednesday, May 8, 2013

Spam is driving me batty


The demonstration piece
I must first apologize for some changes I've had to make to the comments section of Heaven Is Handmaid.
Sadly, you will now have to prove you are not a robot, a spammer, or a very badly behaved person trying to sell me a number of things not at all related to the gentle art of handmade.
For the past week, I have been perplexed and confounded by the weird spam comments that have landed in my email box. There have been no less than 40 useless, tasteless  -- and some very annoying -- "comments" in the past 10 days
The verification will stay on for the foreseeable future. I understand if you would rather not deal with the verification process. But, I just can't deal with this stuff anymore.
When I started with little venture, I wanted to share the things I do, and see what other people do. I have enjoyed "talking" with so many of you over the years. The fact that this is a bad patch will not deter me from keeping the blog going. It might make you unwilling to "visit" with a comment, and while that makes me sad, I understand completely. I just can't cope with the spam clogging up my inbox. End of rant. Sorry.
Please just bear with me until the spammers go away.
Work in progress at the booth
 On to other things: some photos from the CreativFestival on the last weekend of April in Toronto.
I had a great deal of fun talking to people, and showing them how to frame their embroideries in second hand embroidery and quilting hoops.
It was so surprising to see so many young people there -- men and women. I chatted and demonstrated for a couple of hours, and did a little fabric shopping, but not too much. I was home and exhausted before dinner.
Altered mannequin shared the table


Friday, April 26, 2013

Tip-toe through the tulips with me...


 I made up a tutorial for this basket of tulips I am taking to the CreativFestival in Toronto tomorrow.
But, I am also sharing it here, adding some (hopefully helpful) photos. 
These are a nice project to do with kids. They are not hard to do, use up fabric scraps, don't take forever, and introduce some cool sewing concepts.
I can see a nice bouquet for Mom or Grandma for Mother's Day. You can download the patterns from here:
The patterns should print out in actual size. Make sure your printer is set to "no scaling."
Enjoy!


Gathered at the bottom
Gather:
Fabric for the blooms
Fabric for leaves
Small dowels or wooden skewers
Glue
Embroidery floss
Fiber fill
Paint to match leaves
Paint brush

How to:
Fold the material for the leaves in half, right sides together. Place a piece of thin batting, underneath the leaf fabric. Trace the leaf pattern on the top of this fabric sandwich. Pin all the layers together. Using a small stitch length, sew along the traced outline. Cut out, adding ¼ inch seam around the stitching. Clip all curves, turn right side out. Press.
Using embroidery floss, sew a line of running stitches up the centre of each leaf. Pull gently to create a natural looking curve, but do not gather the leaves tightly.
Paint skewers to match the green leaves. Allow to dry.

Glue in the skewer
For the tulip buds, cut out petal shapes from the pattern provided, adding a ¼ inch seam allowance. Sew three petals together, starting at the point indicated. Clip curves, turn right side out. Turn under a ¼ inch hem, press. Run a line of gathering stitches at the hem. Fill bud with fiber fill, pull up gathering stitches, but do not knot. Dab the end of skewer in glue and insert into bottom of the bud. Now, pull gathers tightly. Allow the glue to dry slightly and pull the gathers tightly against the skewer. Tie off. Allow the glue to dry.

For tulip blooms, cut out the rectangle pattern, adding ¼ seam allowance. Turn under ¼ inch hem along the long sides. Press.
With right sides together, join the short ends, using a ¼ inch seam allowance.
Turn right side out.
Run a line of gathering stitches along the bottom of the bloom hem. Dab the end of skewer in glue and insert into bottom of the bud. Now, pull gathers tightly. Allow the glue to dry slightly and pull the gathers tightly against the skewer. Tie off. Allow the glue to dry.
Tack tops together
Fill with fiber fill. You want plump blooms that have body, but don't make them too firm. It's harder to finish the flower if you do.
Tack one long side the adjacent side, pulling tightly. Add a few tacking stitches. On the opposite side, repeat the  tacking stitches, pushing down the fiber fill if necessary. Finger press to form neat points. 
Run a line of glue along the skewer, attach the leaves by folding them in half over the skewer. Use a clothes pin to keep the leaf folded around the skewer if necessary. Allow to dry.

 
The tulips can be displayed in a basket, a vase or even a re-purposed canning jar. I did a mixture of buds and blooms -- just to make the bouquet interesting. Mine are displayed in a small basket with a bit of dry floral oasis hot glued to the bottom.


Wednesday, April 24, 2013

Finishing up before the Festival

Finished roos!
I have managed to finish a number of things in the past couple of weeks. The kangaroos are finished, faces blushing, eyes painted on and the baby's hair bow and heart in place
Then, I made a basket of fabric tulips. I found a tutorial on how to make them, but it is not in English, and though fairly straight forward, I elected to re-draft the patterns to make them easier. I also added a few touches of my own -- I do that with alarming frequency.
This basket of flowers will be coming with me to the CreativFestival this weekend in Toronto, where I will be showing folks how to do a piece of wall art framed in a fabric hoop.
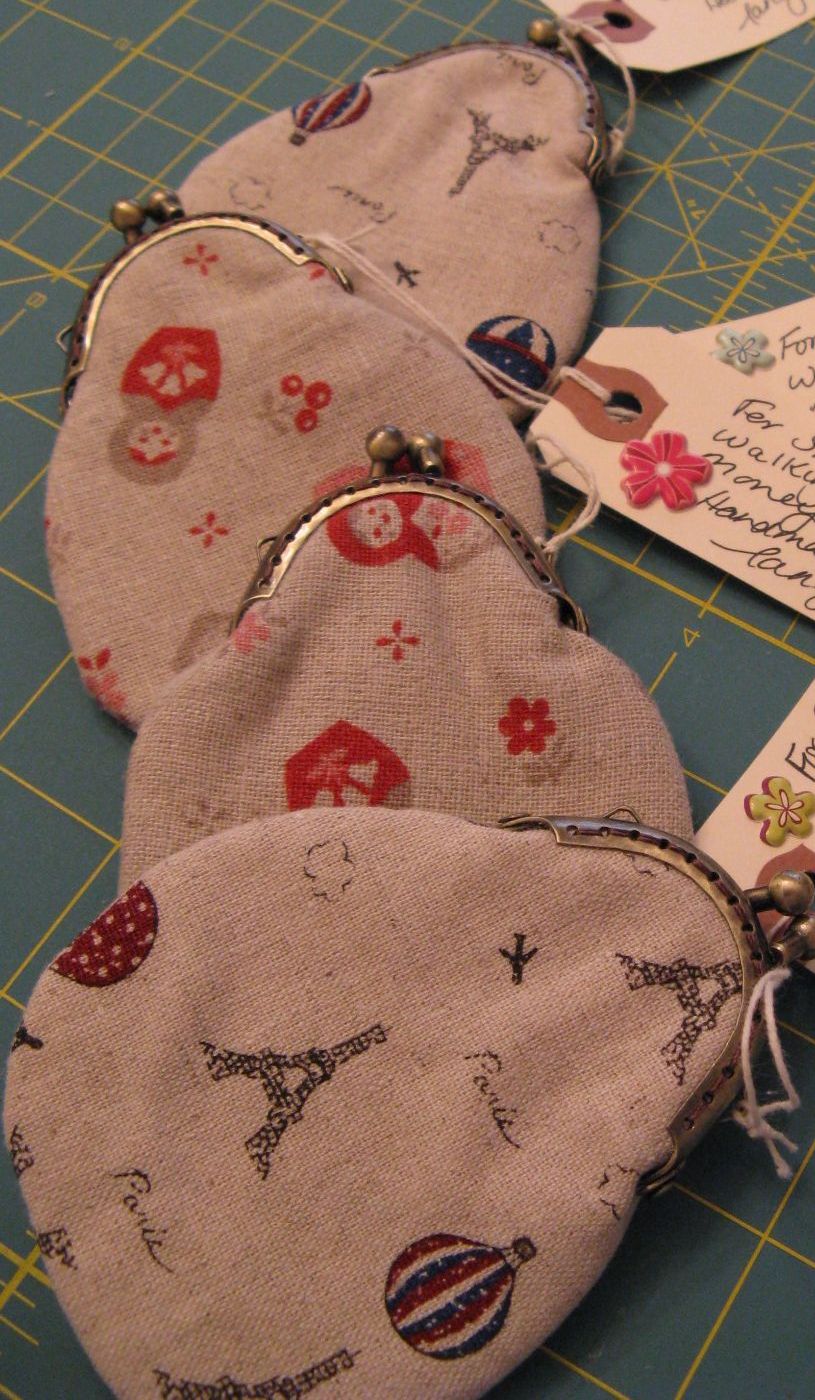
Last weekend, I went to Ottawa to visit my cousins. I made them some little change purses. They got rave reviews, and made me appear terribly clever. I made them small because they are all hikers and walkers. These little purses are small enough to slip into a pocket and could contain enough cash to pay for a little treat like a coffee or an ice cream cone -- a reward for putting in the time to hike.
Now, I am off to finish packing up for the festival. Photos to come!
Have a great week, y'all!
Sewing the tulip blossoms in a chain

Fabric tulip in a basket to welcome Spring

Purses for the cousins' coins

Friday, April 12, 2013

Literally, just limping along...

Birthday purses for some old friends
A couple of weeks ago, I sprained my ankle. It hurt quite a bit. So much that I voluntarily went to the doctor. I even had an x-ray to make sure it was not broken. All this got in the way of my creative pursuits and writing blog posts.
Turns out it isn't a difficult as one might think to sprain an ankle when there are little piles of frozen snow in the driveway, strategically frozen in just the right place to step and twist upon on the way into the car. On the morning I did it, I sort of fell into the car after the slip and twist event. It was not graceful, but at least I was in the car. It didn't even hurt right away.
The pain emerged at the grocery store, and was horrible on the drive home because I had sprained the foot that does all the pedal business involved in driving.
We have had some freaky weather lately, freezing, thawing, snow, rain, freezing and more thawing. Despite all best efforts, there was bound to be some snow and ice to trip me up. And so, I was forced to prop up my foot and ice it down -- 20 minutes at a time all day long. At one point, Sandra came over to visit and brought me some fabric with Russian dolls all over it. This brought great joy, and as usual, Sandra herself cheered me up and swept away my grumpy mood immediately.
During this foot propping, iced-over sprained ankle adventure, I was able to do a lot of armchair projects.
Kangaroos!
First up, are some linen/cotton coin purses, made for girlfriends I have known since childhood. We got together to celebrate our birthdays, so I was able to limp in to the restaurant bearing handmade gifts.
I also finished three ornament designs for A Needle Pulling Thread Magazine's Festive issue, which is due out in August/September of this year. (This is now available in digital format now through Zinio and Apple Newsstand) I can't post a photo yet, but the ornaments I designed are inspired by vintage gift tags. They are embroideries in retro colours, mounted in four-inch embroidery hoops. They can be used as package toppers, gift tags or tree decorations. I had a blast doing them, and I hope the readers like them too.
Then, I fulfilled a long time desire and made a Tilda Kangaroo. This pattern was featured in Australian Homespun Magazine in 2008. The stuffing and construction was just the kind of project I needed to keep me busy and occupied while I waited for the ankle to start feeling better.
The kangaroos are now awaiting their face painting and final touches, and my ankle is less painful now. I found I could even do some sewing at the machine yesterday. Next up: walking outside. But, not today, we have had freezing rain again last night. I think I will keep the ice on my ankle -- not under foot.
 Have a lovely weekend everyone!

Friday, March 15, 2013

A Tiny Tilda bear on a tiny perfumed chair

I finally finished the tiny bear from Tilda's Winter Wonderland.
Now, those little details might drive some people crazy. Not me, I love them. She was a perfect armchair project once all the little seams were completed using the machine.
Next, I am doing tiny bunny.
The bear's little perch is an old perfume bottle from Avon. It is a replica of an old fashioned ice cream parlour chair. The base of the chair contained creme perfume and the top is a pin cushion.
It was included in a pile of things my Aunt was editing from her house, and was on its way to Goodwill. But first, I was invited to rifle through the pile before it went to the thrift store.
Surprise! Buttons and a wooden spool also came home with me.
The Avon bottle even had a bit of creme perfume in it -- until I got it home.
 Perfume doesn't travel well from 1973 to 2013. It was quite a weird smell. Not unpleasant exactly, but not something one really wants hanging around. I scooped out the rest with a craft stick and paper towel and washed it thoroughly. Now it is a benign keepsake of the summer I learned to make my own clothes under the careful guidance of my auntie, who has always shared herself and her talents with me.