Saturday, August 11, 2012

Blu-it-ful plummage!

Jellybean, the parrot
Miss B is working as a summer camp activities co-ordinator. This week, it was Pirate Week. Naturally, she had to have a parrot. She kept telling me not to worry about making a parrot, but I KNOW how to make a parrot, and my Tilda's Studio book has a pattern for a cockatiel.
Me being me, I decided to switch a few things up and created Jellybean. She is called Jellybean because of the print on her wings. She is also a Norwegian Blue, the parrot celebrated in the famous Monty Python Dead Parrot Sketch.
My inspiration for the colour scheme came from the line, "Beautiful plummage..." I had to find some fun, colourful fabric for the wings.
Then I remembered a little scrap that I acquired from Sandra.  Covered with jellybeans, her wings were a big hit with Miss B's little campers!
Speaking of fabric acquired from Sandra, look at what she sent to me via a website called Pink Castle Fabrics.
Many Mini Gnomes in Blue
Present from Sandra!
I just love this fabric! I don't even know what I am going to make with it, but it will likely be something for DH birthday this December.
In our family, we have a thing for gnomes.
Each year, we search and search for  a gnome for DH New Year's Eve birthday. I can't remember why we started doing it, but it is one of those family traditions, stridently observed and insanely important. 
One year, we found a little traveling gnome. Thereafter, now and then, the gnome actually travels. There are always photos of his adventures, and they are part of our family photo history.
He's been to London to visit the Queen
This spring, the Gnome mysteriously showed up in London, Paris and parts of Scotland.
He event went to London to visit the Queen!
But, since there is Gnome place like home, the traveling gnome always comes home and sits on the bookshelf, waiting patiently for his next adventure.
The gnome fabric might become just about anything, and it will serve as a reminder of not only how much fun gnomes are, but also of how lucky I am to have such lovely friends.
Thanks, Sandra. You are a peach I tell ya! A peach!

Tuesday, July 31, 2012

Not your average thrifted tea bag!

The parts of the tea towel bag
Sandra, Amanda and I went a thrifting on Friday night. We trolled our usual haunts. Sandra found this old timey Swiss dot muslin bag and admired the frame, but she has some styling purse frames coming her way soon, so she passed the bag and its frame to me. Yay!
I am a great admirer Swiss Dot Muslin, I had several special occasion dresses made from the stuff during my long ago childhood, including one made for my Grade 7 music concert, which was also my Grade 8 graduation dress.
This Swiss dot muslin, however, had seen better days. But, no worries! I had repurposing plans for the bag frame.
It just so happens that I had found a cotton waffle weave tea towel a few weeks ago at Value Village. It was brand new, and by April Cornell, who designs things with bright florals and vibrant colours. I was hanging on to that tea towel until the perfect project came along. I had also scored some plain yellow cotton in the remnant bin last month, so I had all I needed to get started.
The outside

On the weekend, I carefully pulled the old musty bag off the frame. Then, I pulled the bag apart to use the parts to make a paper template. The old bag also had a coin purse attached to a chain, which was clamped onto the sides. I carefully pried it off for use in the new bag.
This is my project for Wendy's repurposing challenge (which closes today, so yay me for actually meeting the deadline).
The inside and the coin purse
The best thing about this project is that I knew exactly how I was going to do it as I went along. A little triming here, a little curve clipping there,  a lot of serious pressing as I went along, and I was finished in under two hours. Yay me!
Now I have to get myself invited to a garden party so I can show off my 50s inspired bag. Or maybe I will just start using it for no reason. Life is short, and tea towel bags don't come along very often!

Monday, July 30, 2012

A dashing new dust cover is finished!

Look, I finished my sewing machine cover!
It features linen, free motion quilting, a Tilda embroidery, ric rac AND gingham bias tape. Those aren't polka dots on that fabric -- they are vintage buttons -- it is from a line by Lakehouse Dry Goods. Those are pink polka dots are on the top.
I made up the design, so I decided to put all my favourite things in one pretty cover. It is much nicer than the hideous vinyl thing that came as a "bonus" with my other machine.
Now Bernie has a lovely coat to wear when we can't be creating together. As we all know, it is important to look pretty, even when you aren't doing anything...
More importantly the new cover it will help protect her from the vast amount of dust she must live with day after day. :-)

Sunday, July 29, 2012

Where has she been????


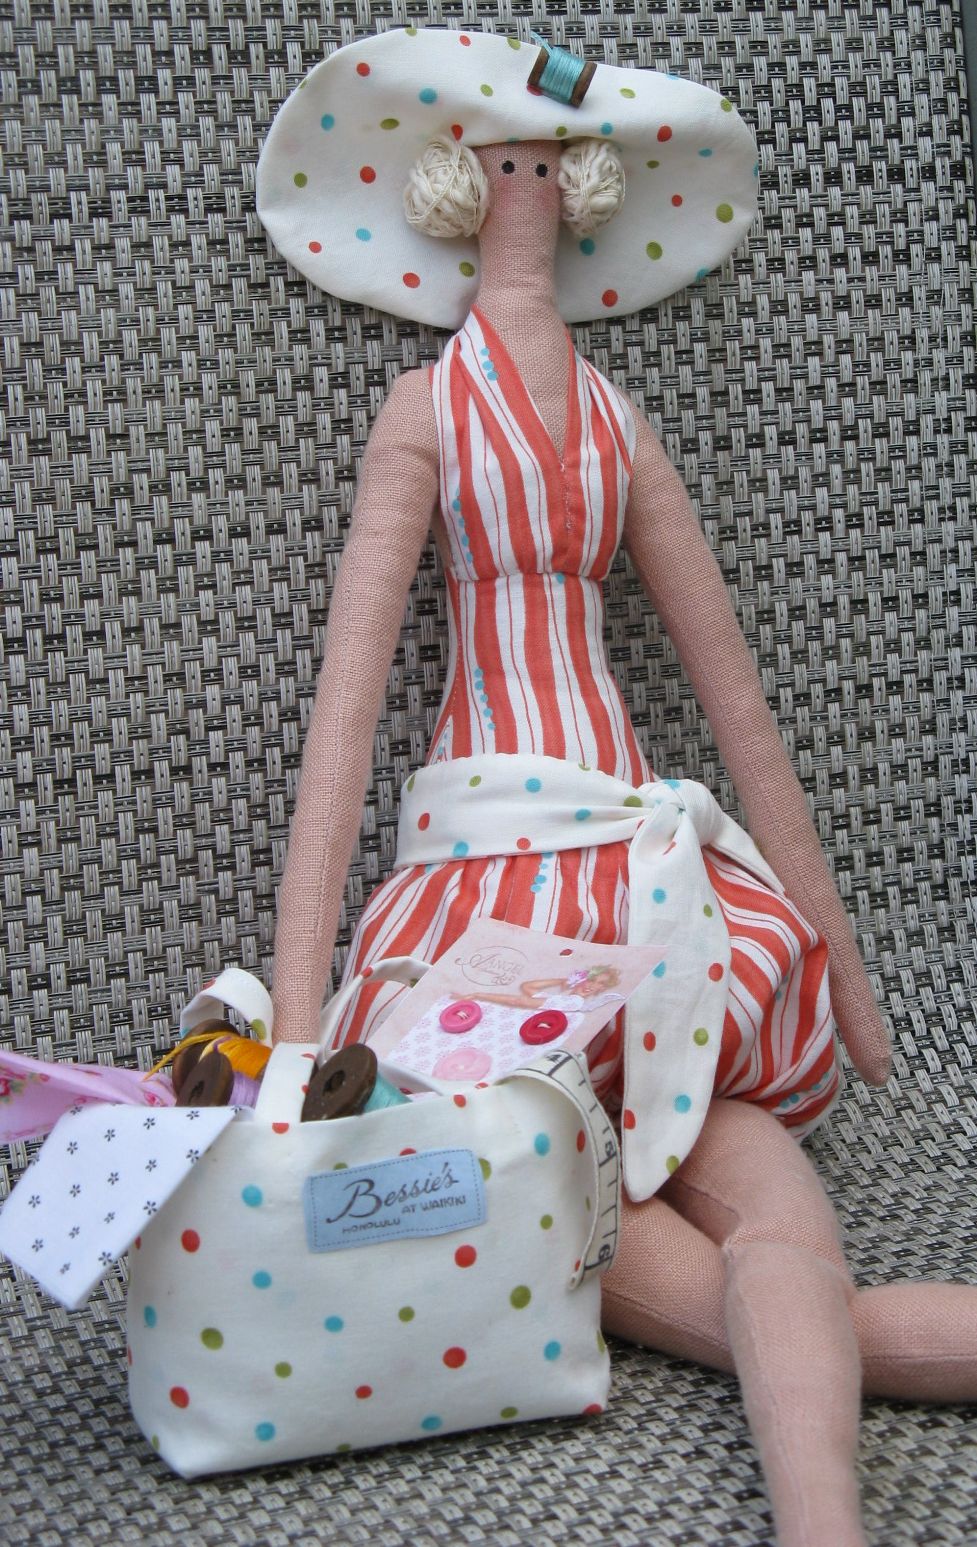
Dottie and her beach bag
I finally finished this Tilda angel, featured in a magazine in the UK called Tilda's Homemade Ideas. It is the price of a craft book, and for me to order it would be really cost prohibitive. However, I have really nice European friends who shared the instructions with me.
Dottie, as she is known, has not only a floppy hat and 50s inspired bathing suit, she also has a beach tote filled with all her stitching supplies.
All of the Tilda dolls are a challenge to do, but this one was really tricky. The difficulty lies in getting the stuffing done properly, and without lumps. Doing this doll's stuffing took me three tries, and it isn't totally perfect, but eventually, I had to move on.
This doll will be going with me to the fall Creative Festival in Toronto. I will be part of A Needle Pulling Thread's booth, promoting not only the magazine, but also the work of independent needle workers.
I must confess, I have been a bit stuck. Creatively, and otherwise, I have been challenged to keep focused and getting things finished. This happens to me a lot, and I always find it frustrating. However, I have learned to be patient with myself and the finishing will come. I just don't have to like it!
This week, I am also working on finishing my sewing machine cover.
I started it ages ago, but I was busy getting ready for vacation and didn't get it finished. I also have to finish my houses wall hanging.
Oh, and I want to finish my re-purposed project for Wendy's challenge by Tuesday.
Kind of a boring post, sorry. But, I do thank you for reading my to-do list!

Tuesday, July 17, 2012

... and we're back to our regularly scheduled life


Houses awaiting their doors
The vacation was not long enough. It wasn't nearly long enough. However, it was a welcome respite from the regularly scheduled stuff that seems to happen around here.
I made good progress on my Homes wall hanging. I have to put the little doors on all the houses.
I didn't do it at the cottage because the iron there doesn't heat up enough. I wanted to use fusible web to attach the doors. That is best done at home, where the iron is marginally better.
I saved the bits lefts over from the cutting charm squares to make the doors.
Then, just as I was about to decide which little house would go on which large square, I realized I forgot the post-it flags I normally use to label rows. This meant I would probably get it all messed up when it was time to put all the blocks together. I refused to go into town to get the silly post-it flags. Instead, I called in the technological marvel that is my camera.
I took a load of photos while I was auditioning the houses onto the blocks to make sure I had a clue where my thoughts were on my layout. It takes me forever to arrange blocks, and now I won't have start all over again. I am so glad I remembered to take that photo -- even if I did forget my helpful little flags.
While we were away, I tried a new  "company" dessert using summer berries. This version of tiramisu is amazing. It has little Maria cookies dipped in Tia Maria as the crust. Here's what you do:
Dip the cookies quickly, and then gently press them against the sides of a glass bowl or deep dish pie plate. Beat a 475 gram tub of Marscapone cheese with 1/2 cup of whipping cream. This takes about three minutes. It should be like whipped butter.  Refrigerate for at least two hours. Prepare the fruit mixture: 1/2 cup of hulled and halved strawberries and a half cup of blueberries, stirred together with 3 tbsp sugar. Cover and refrigerate.
This is berry good
At serving time, top the dish with the berries and juices. Serve. Take a few bows -- and try to blush attractively at the compliements.
I made this twice for company while we were away. It was elegant without too much work, and it was a perfect end of a summer meal.
While I was working on my wall hanging, one of my guests, a quilter who travels to a quilting meeting each week, admired my pin cushion for its petite and portable size. It is from last autumn's issue of Mollie Makes.
When I returned home, I made her a pear with some of my many pretty scraps. I found the lady bug at the dollar store. It is really a push pin, but I glued it into the pear as a decoration. I hope my friend likes her new pincushion, and that it travels well.
A single traveling pear
Now that I am home, and all my deadlines are met, I am hoping to work on some just-for-fun projects before I plow head long into the Christmas making.
One of them is a new Tilda doll. More on that very soon!

Saturday, June 30, 2012

Gone fishin'

Heyho, it's off to lake we go!
http://www.allpeoplequilt.com/images/slideshow/QAM-winter-11/QAM-CO-winter-11LG_ss8.jpg
Wall hanging ... WIP by the lake
We are heading off to our annual reading fest by the lake. The DH and I look like lumps on logs, parked by the lake from morning until evening, reading from our ebook libraries.
After dinner, we take a little boat cruise on the lake to watch the sun go down.
I know, it sounds like sloth disguised as a vacation. But honestly, it is my dream break.
I also bring a large hand sewing project with me. This is year, it it a wall hanging from Quilts and More Winter 2011.
I collected up numerous Sweet Water Homegrown fabrics, as well as some neutral backgrounds. This stuff is rarer than hens' teeth around here, so it took a while to find what I wanted. I found three packages of charm squares on sale at Quilt A Bag, and that was a tremendous help in getting the house appliques looking the way I wanted them to look. The background blocks are 10 inches square, so I had to improvise a bit.
Christmas in nearly July...
I did all the little house applique pieces yesterday. I do a cheater version of needle turn applique. Right sides together, I sew muslin to the piece, clip the curves and corners, make a slit in the muslin, and turn the shape right side out. Then, I just sit by the lake and stitch the applique to the blocks.
Hopefully, I will make such stunning progress, the wall hanging will be ready for its close up when I get back.

In the meantime, here is a photo of one of the projects I created for the Festive 2012 issue of A Needle Pulling Thread. The deadline for this issue was the end of June. I must admit, it was a challenge writing about festive gift giving as the temps here soared. I love the way these projects turned out, so I hope the readers do as well!
Catch ya later!

Sunday, June 17, 2012

Sew, pack and go!

Our friend Amanda is on holiday right now.
She took a really nice set of bags with her (if I do say myself, and I do).
Sandra and I did a zipper/tote bag set for Amanda's adventures.
We also entered it in the Purse Palozza challenge. Find out more about that here.
Sandra found the fabric for the set on a $2 a yard clearance table in the United States a while back. Amanda really liked the set, and is looking forward to looking stylish on her travels.
This pattern is from Sew Pretty Homestyle by Tone Finnanger.
The kanzashi flower is the "pointy" style, which is a bit of a departure for me. I usually do the rounded petal ones. I am getting better at folding them though. I have found that less pressing with the iron is the key for me.
Sandra's zippered pouches are, as ever, both useful and cute.
Well done to us, I say!